User Type Management
User Type panel is on the left side of User Management page.
This panel is to manage different user types and user roles to be used in the system. This panel can be hidden by clicking on the ![]() button. It can be brought back by clicking on
button. It can be brought back by clicking on ![]() button.
button.
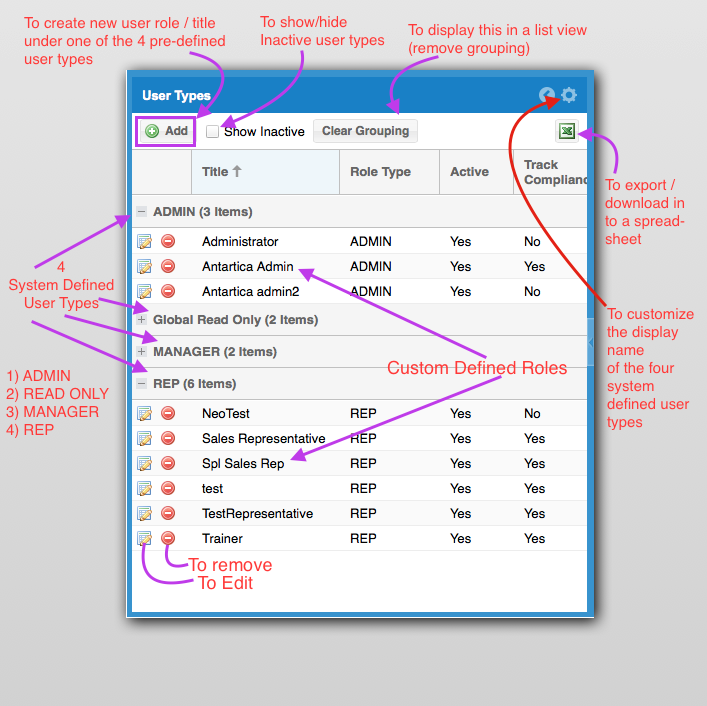
As shown in the picture above, there are four pre-configured or pre-defined user types:
1) Administrator - Full control over forms, data access, database access, store visit frequency, job schedules, etc. in their respective regions or countries.
2) Manager - Make store visits, view all data collected by Representatives assigned to them, assignments, reports, approvals etc.
3) Representative - Make store visits, view all data they have submitted (not others'), can control their store visit calendar etc.
4) Global Read Only - To view data across different countries. Unable to submit reports or schedule visits etc.
Each of these user types has pre-defined meanings, authorizations and access privileges. In a general sense, users who are Administrators will have the ability to control the credentials of users and the information / resources made available to users in their sales geography. Managers will be able to see the reports and forms submitted by their team members and perform certain managerial functions such as approvals etc. Representatives will be able to perform their individual tasks and see the information they processed. Read-Only users will be able to just see (view) data, but not edit or update or add any data.
Clicking on the 'Clear Grouping' button will display the user types as a list by removing the grouping (as shown below). Clicking on the 'Group Results' will apply the grouping back.
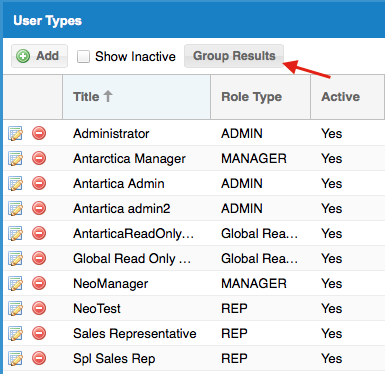
User Type list can be sorted based on the column headers. If the grouping is ON, the sorting will be effective with in the groups.
Checking / unchecking the 'Show Inactive' box will Show/Hide inactive User Types.
You can download all the user types in the system as an excel spreadsheet by clicking on the excel icon at the top right corner of the panel (refer to the picture above).
Edit the display title of a User Type:
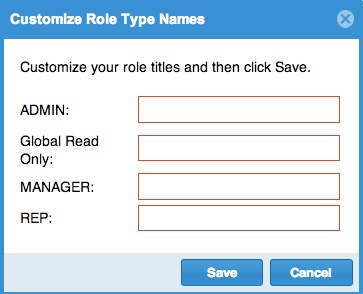
At this point, you cannot add another user type or remove one of the four existing user types. Only the display names can be changed. The display names of these 4 user types can be changed by clicking on the settings button.

Clicking on the settings button will pop up a window like shown below, where you can type your preferred names. The idea here is that if in your country it is more appropriate to refer to an Administrator as a “Director” or a Representative as an “Executive” for example, you can change this to more accurately display your user type.
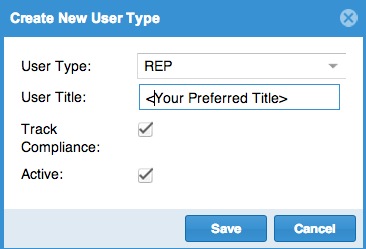
Under each of the User Types, you can create as many roles as you prefer suiting your organizational needs. In the panel figure above, you can notice user defined roles such as 'Antartica Manager', 'Trainer' etc. This enables you to create different types of managers and different types of representatives. For example, you may have a representative that is a dedicated trainer and another one who is dedicated to special events and another that may be an expert on just product. You can define custom roles to denote these differences. However, REP solution will treat the authorization rules of those custom roles per the user type chosen. You can create a new Role by clicking on the "Add" button at the top left corner of 'User Types' panel.

Clicking on the 'Add' button will pop up a window like shown below, where you can choose the user type (level) and enter your preferred role name (title).
Once a custom role is created, it will get listed in the User Type panel (as shown below). Roles are grouped under their corresponding user type level. Role list aggregated under a User Type can be sorted by clicking the column header.

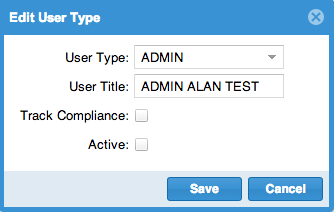
'Track Compliance' is a flag used for users who submit reports. If track compliance is set to ON (tick mark) for a user, then, his/her manager can set frequency of store visits in a month. REP system uses this data to compute compliance assessments and show results in dashboard. Typically, this flag is set ON for 'Representative' level users with store visit frequency compliance requirement.
If the 'Active' flag is ticked, this new role will be available to be assigned to users (persons). If the 'Show Inactive' check box at the top of 'User Types' panel is checked, all user types and associated roles will be shown. If unchecked, only active user types will be shown.
To edit an existing Role associated to a User Type, click on the edit button of the corresponding row. It will bring up a window similar to adding a new role. You can edit all the fields (User Type, Title, Track Compliance and Active status)
![]()
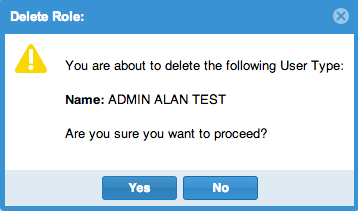
To remove an existing role, click on the remove button of the corresponding row. That will prompt a confirmation window. The role will be removed if you click 'Yes'.

NOTE:
If you only want to hide or in-activate the role for a period of time, it is better to edit the role item and un-check the 'Active' box and Save. Thus, you do not have to create the role again at a future point in time. Also note that deleting a role will not delete the historical records of users with that role.