The diagnostic report feature in client applications allows users to send technically relevant details of the device, operating system, user, last inbox / outbox activities, errors and exceptions (if any) etc. to the technical support team. You can think of this as a technical log file of the application. Having a diagnostic report would help the technical support team troubleshoot / diagnose a problem faster.
Here are some typical scenarios when diagnostic records are highly desirable to be send to us:
1a. On Windows 8.1+ application (tablets/laptops/desktops etc.)
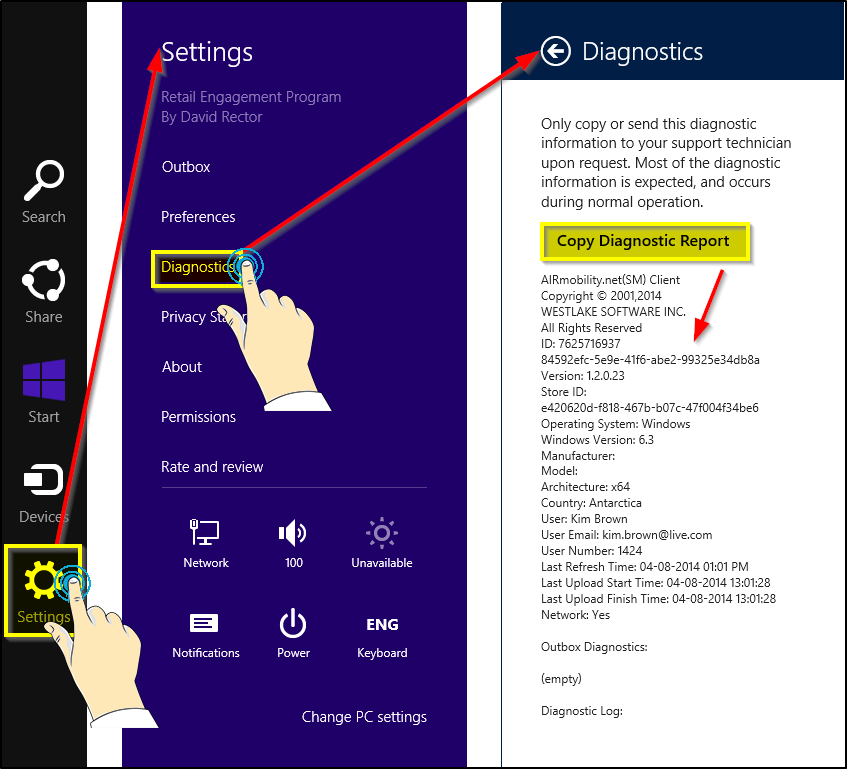
To send a diagnostic report on Windows 8.1+ applications, please go to 'Charms Bar' >> 'Settings' >> 'Diagnostics' and click on the 'Copy Diagnostic Report' button, which will copy the report to the clip board. Then you can paste it on the trouble ticket description box or email to us at msftreps@westlakesoftware.com.
1b. On Windows Phone 8.0+ application (phones)
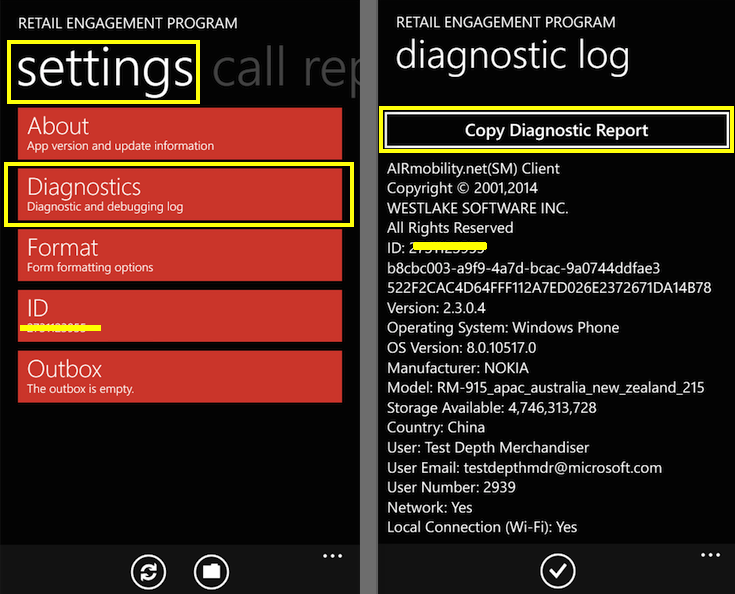
To send a diagnostic report on Windows 8.1+ applications, please scroll to 'settings' section (orange color). Then go to 'Diagnostics' menu item and click on the 'Copy Diagnostic Report' button. This will copy the report to the clip board. Then you can paste it in an email and send to us at msftreps@westlakesoftware.com
2. Changing settings for sleep function on Windows 8.1+ device:
At times it is handy to increase the sleep time of your device to ensure an attachment heavy form is fully processed and transmitted to the server. Increasing system up time in the battery power plan may decrease overall battery standby time although this will allow your device to stay awake longer in order to complete upload of call reports.
There are 2 methods to do this:
Method 1 : Through Modern Tile styled start screen of Win 8.x devices
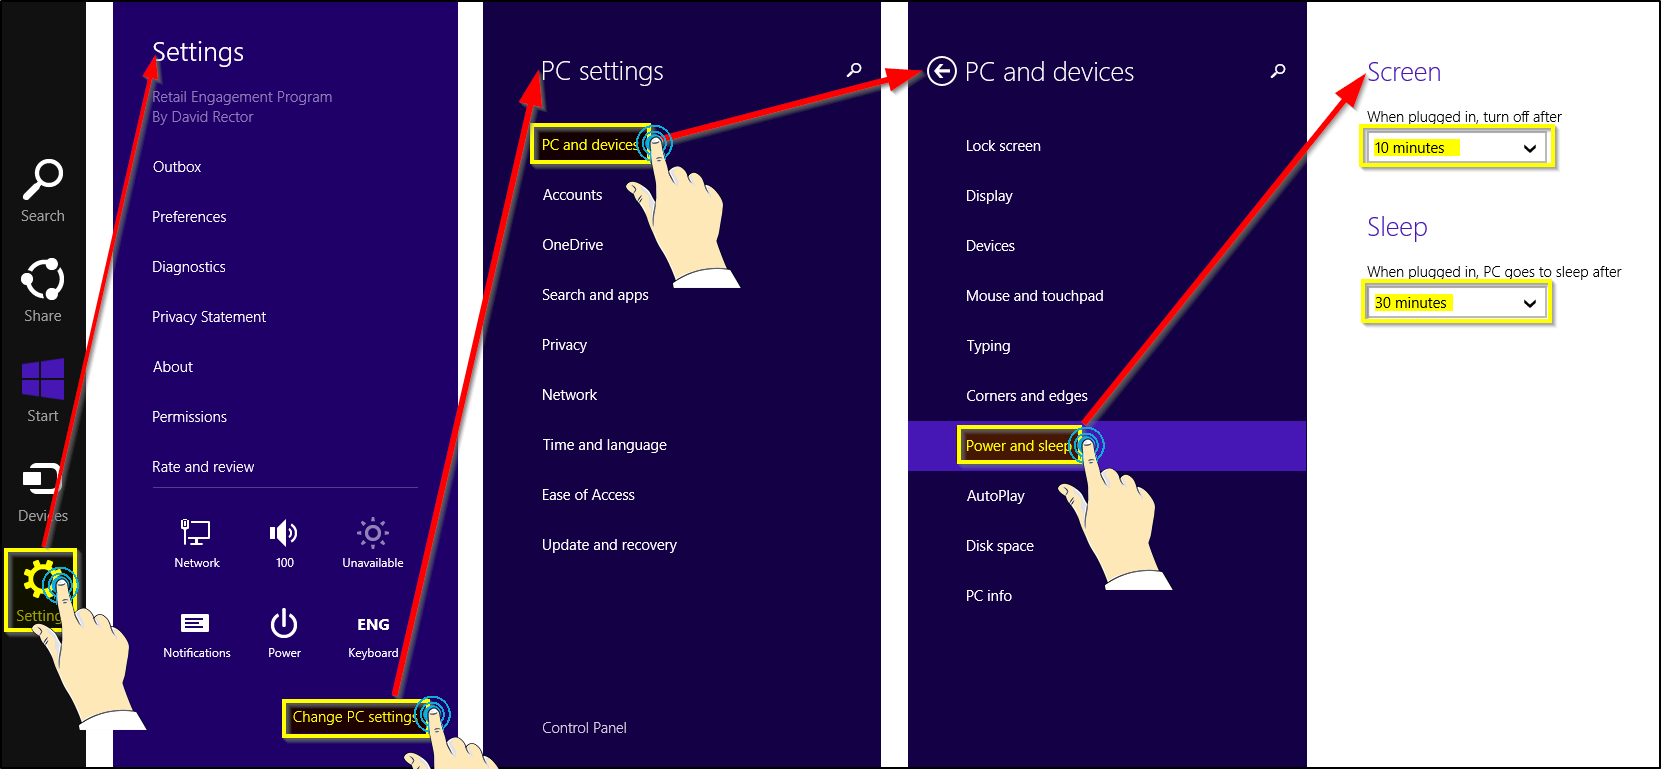
Go to : Charms Bar >> Settings >> PC Settings >> Power and Sleep. Adjust the sleep time as shown in the picture below:
Method 2 : Through desktop mode
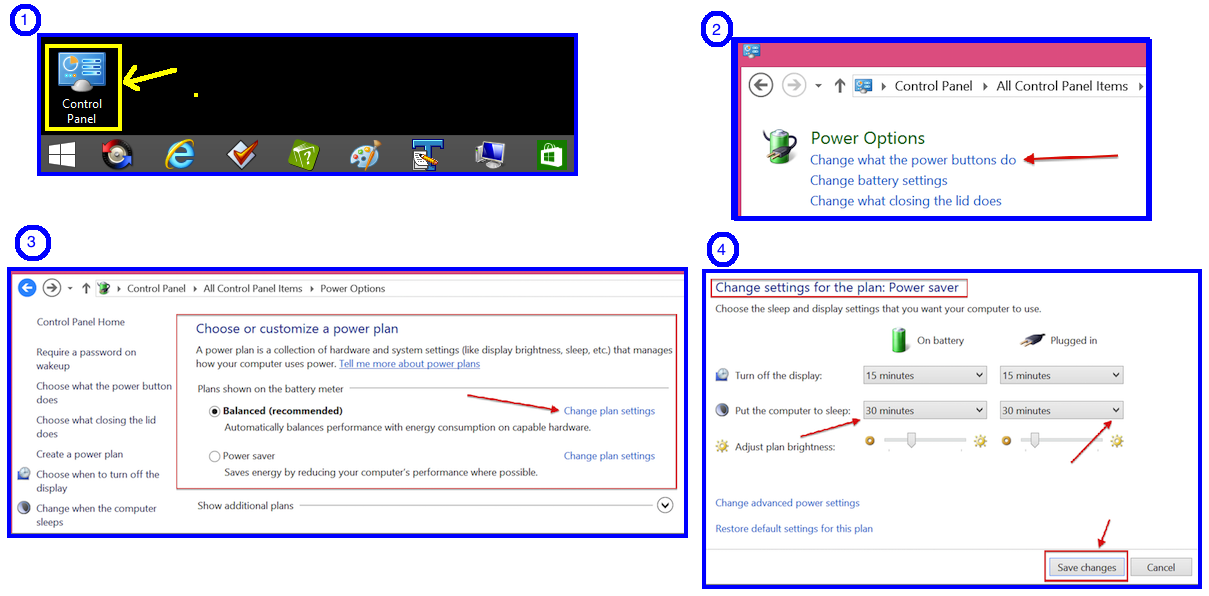
Go to: Control Panel >> Power Options >> Customize a power plan >> Change settings for the plan. Refer to the pictures below:
3. Upgrading the client application to a newer version:
Upgrading REP app means installing a newer version of the app with out un-installing the currently installed version on your device. Upgrading will overwrite the REP software program with out deleting its data or files (including pending Outbox items) on your device. If you have not set your device to auto upgrade apps, you might want to manually upgrade when ever a newer version is available. This will get you access to new features, security updates and bug fixes.
If you turn ON automatic update, Windows Store will automatically upgrade when a newer version of the app becomes available. Please refer to this link for more details on how to do it: http://windows.microsoft.com/en-au/windows-8/automatic-app-updates-help. This topic will help you perform manual upgrade in case you choose not to turn ON automatic upgrades.
Before you begin the upgrade process, first, verify the current version installed on your device is not the latest already. This is possible if you have set the device for auto-upgrades. Please refer to section 6 of this page to check the current version. Then, allow the Outbox to process any recent forms submitted; give ample time to connect to Internet and upload to the server.
3a. On Windows 8.1+ application (tablets/laptops/desktops etc.)
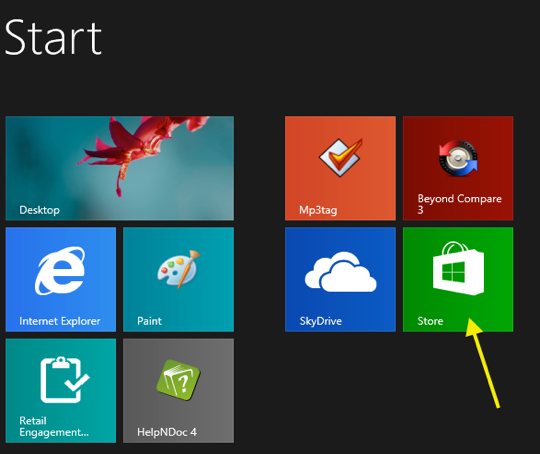
Step 1: Go to Windows Store
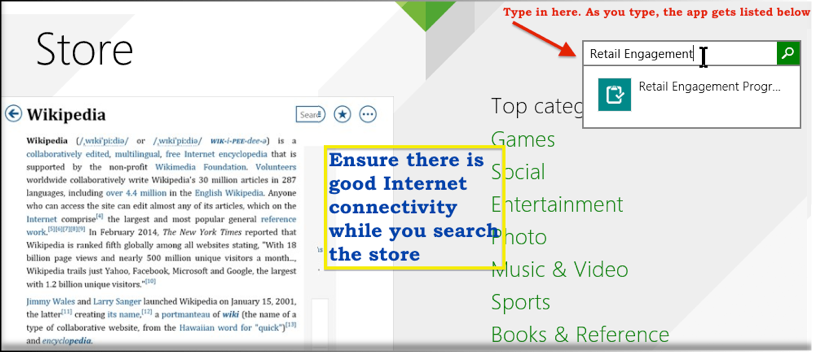
Step 2: Search for "Retail Engagement Program"
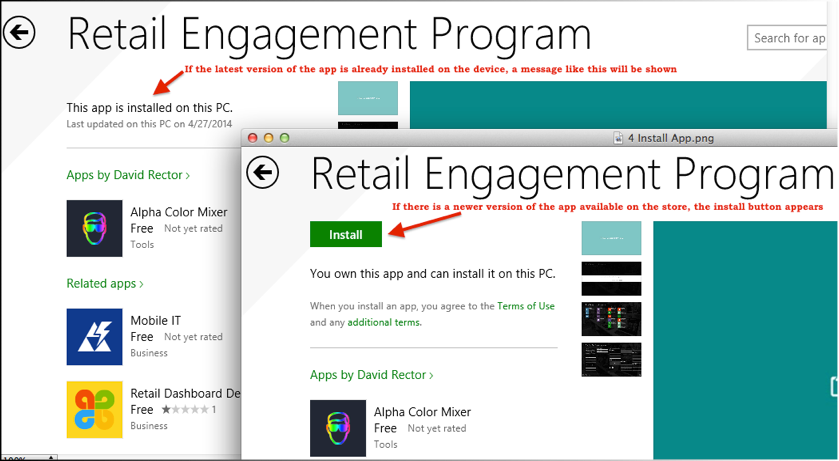
Step 3: Once you find the app, just open its page and hit 'install' button to start the upgrade.
Alternatively, you can open this link in Internet Explorer on your device: http://ow.ly/xCveU (case sensitive). Please note that the 'install' button will appear only if the version in Windows Store is different from the version installed on the device. In some rare cases, you may not see the 'install' button despite being on an older version. In such cases, you can force an update from the store. For this, open Windows Store Modern app. Then open Charms bar >> Settings >> App Updates and click on the 'Check for updates' button. If REP app shows up after that, you can click on it and click on 'Install' button at the bottom.
Step 4: Watch out for the installation progress message. Upon completion, a success message will be shown like shown below:

This completes the upgrading process. Now, please completely turn off your device and turn it back on. Then open the app and wait for a while until the self check / recovery routine starts. Ensure you have good Internet connection. It will automatically pick up the same user ID used before on the previous version.
3b. On Windows Phone 8.0+ application (phones)
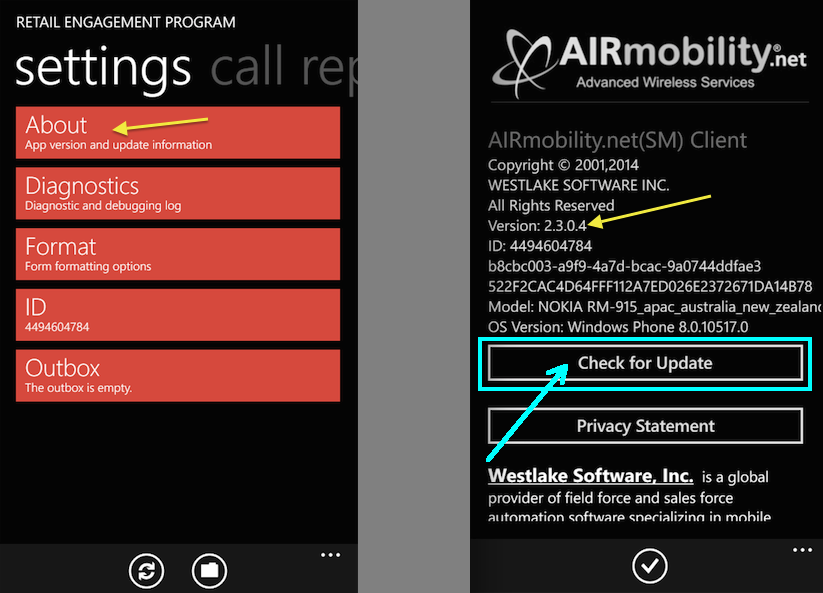
First, verify your version number is not the latest already. For this, open the app and swipe to 'settings' section (orange color), then select 'About' menu. The version number will be listed near the middle of screen; (e.g. 2.3.0.4). Check the circular you have received to know the version number of the latest version. Then, allow the Outbox to process any recent forms submitted; give ample time to connect to Internet and upload to the server.
To manually upgrade Windows Phone 8.0+ application, the easiest way is to open existing REP app. Then scroll to 'settings' header (orange color). Click on 'About' menu. Then click on 'Check for Update' button and follow prompts. Alternatively, you can open the link: http://ow.ly/ucC2Z (case sensitive) in Internet Explorer on your phone. Once you complete the upgrading process, please completely turn off your device. Turn it back on. Open REP app and wait for a while until the self check / recovery routine starts. Ensure you have good Internet connection.
4. Clean re-installation of client application:
Clean re-installation is to completely remove (un-install) the current version of the app from the device and then to install a newer version. This ensures all files, software and data of this app are completely wiped out and a fresh and latest copy of the program is installed. It must be noted that clean re-installation is different from upgrading. While doing a clean install, the app will have to re-download all resource files and form data, which requires good Internet connection and could take a while. Also, any data residing in Outbox, i.e. not transmitted to the server will be lost. Therefore, we suggest you perform a clean re-installation only if you feel your installation has become corrupt beyond self correction or in situations like Outbox recovery function fails repeatedly, forms being irrecoverably stuck and inhibiting other forms from being transmitted to server etc.
4a. On Windows 8.1+ (tablets/laptops/desktops etc.)
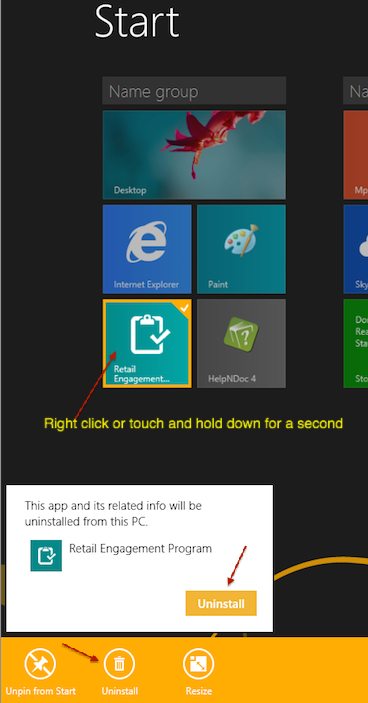
To clean install the Windows 8.1+ application, please right click the app tile / icon or hold down the app tile / icon for a second, it will then turn to select-mode as shown in the picture below. Click un-install button and confirm. Now, go to Windows store, search for "Retail Engagement Program" and install. After the installation, open the app and when prompted, enter your assigned 10 digit ID.
4b. On Windows Phone 8.0+ (phones)
To clean install the Windows Phone 8.0+ application, please right click the app tile / icon or hold down the app tile / icon for a second, it will then turn to select-mode as shown in the picture below. Click un-install button and confirm. Now, open the link: http://ow.ly/ucC2Z (case sensitive) in Internet Explorer on your phone and follow the prompts. After the installation, open the app and when prompted, enter your assigned 10 digit ID.

5. Refreshing data on client application:
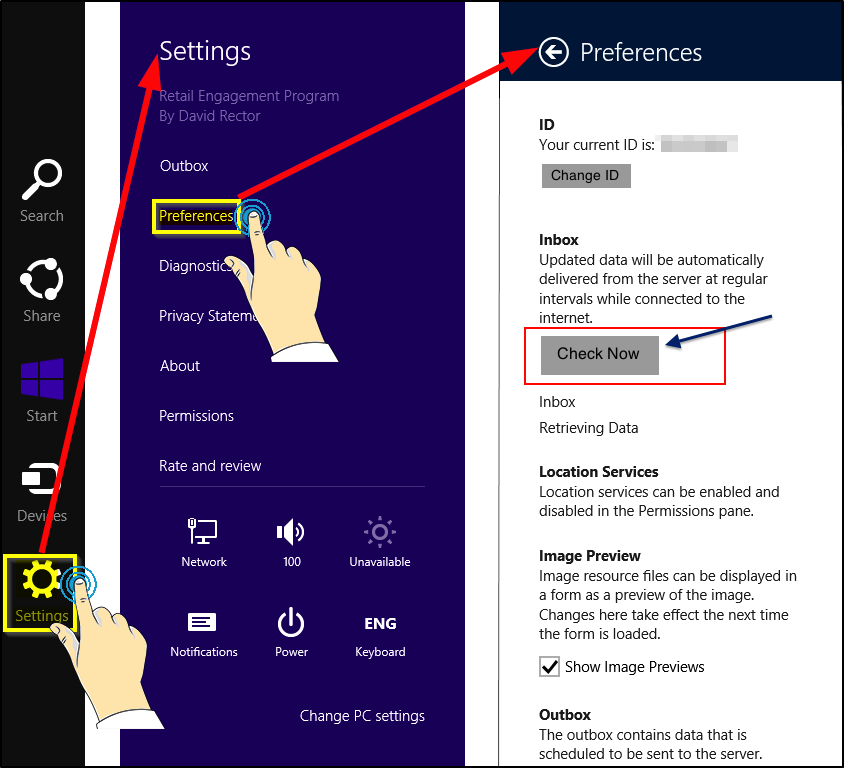
5a. On Windows 8.1+ application, to manually synchronize the app data with server, i.e. to refresh the data / files, go to Charms bar, click on ‘Settings', then ‘Preferences' and click on ‘Check now’ button under "Inbox" section.
5b. On Windows Phone 8.0+ application, to manually synchronize the app data with server, i.e. to refresh the data / files, click on the refresh button available at the bottom of the main screen of the app (as shown in the picture below).

6. Check the version of client application:
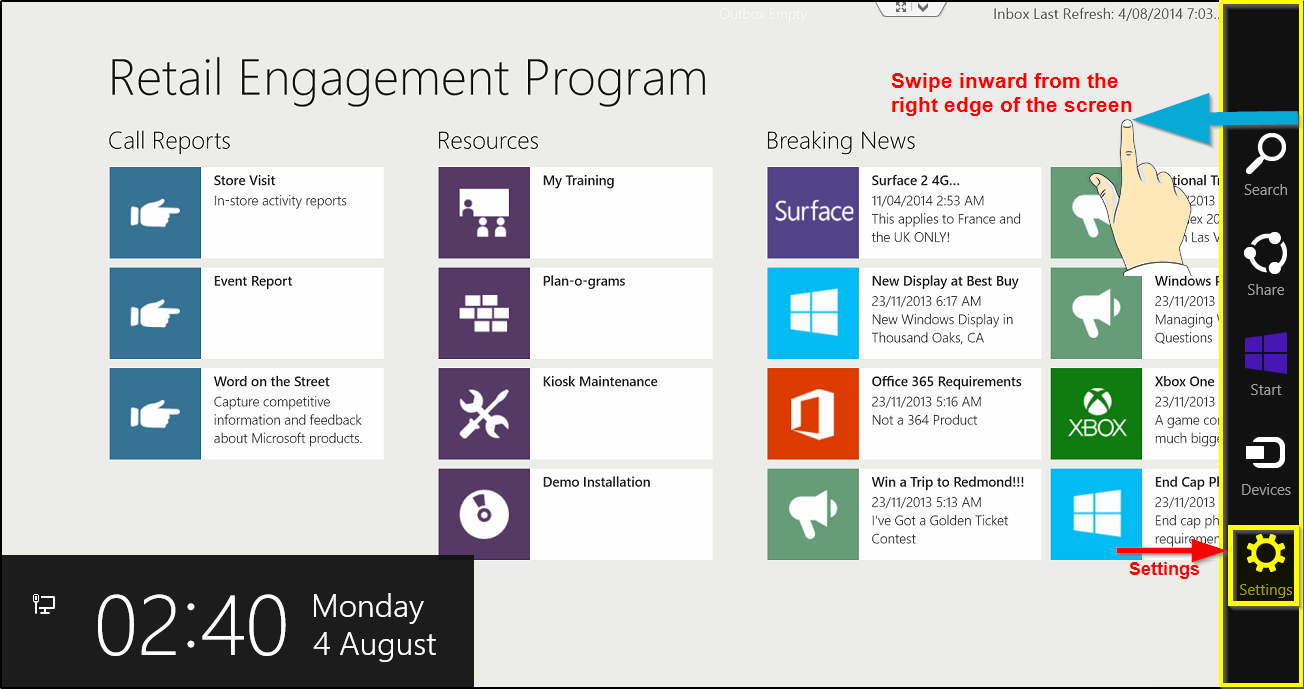
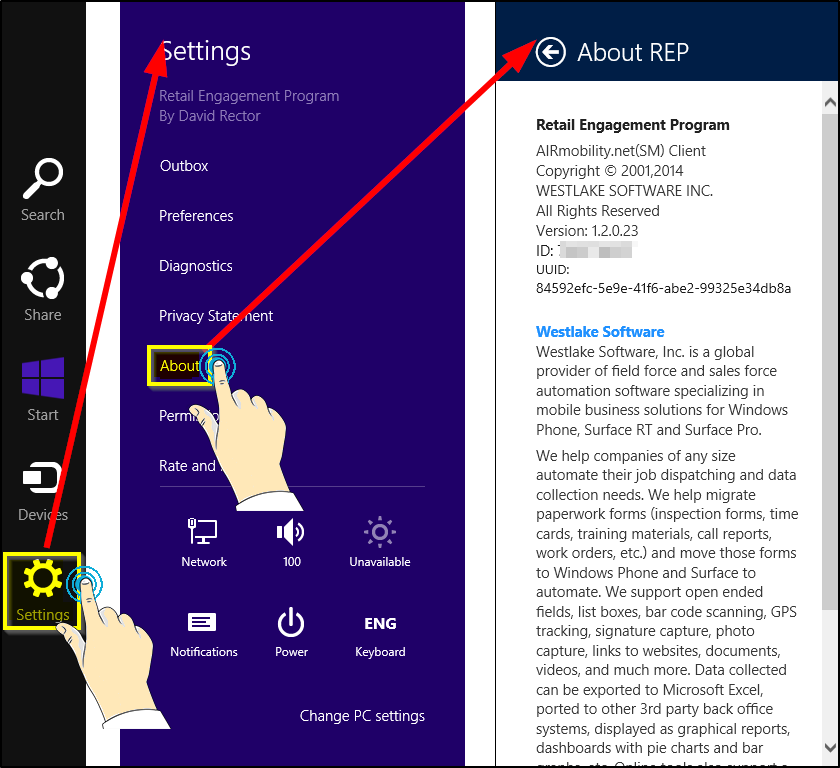
6a. On Windows 8.1+ application, to check the installed version of the app, bring up the ‘Charms Bar’ and click on the ‘Settings’ icon. For touch screen devices like Surface RT or Surface Pro, the best way to bring the charms bar is to swipe inward from the right edge of the screen like shown below. Then click on 'Settings' >> 'About'. You will see some thing like 'Version: 1.1.0.29'. The last 3 digits are normally used to mention the version number.
6b. On Windows Phone 8.0+ application, to check the installed version of the app, scroll to 'settings' section (orange color), then click on 'About' menu. You will see something like Version: 2.3.0.4

7. Completely stopping the client application:
Simply closing the app on a Windows 8.1+ device (e.g. Surface RT) or a Windows Phone 8.0+ device (e.g. Nokia Lumia phone) will not fully stop the app. By doing so, it just goes in to inactive mode.
While working on REP client app on a portable device (tablet, smart phone etc.), if you press the Windows / Start button ![]() or open another app, the REP app instance is not stopped / terminated. It just goes in to background mode (a dormant state). That means, the state of the app is saved and you can almost always return to the app where you left it. This can be desirable if you are multi-tasking (working on multiple apps including REP app). But, there are times when you want to completely terminate the app instance and open / start it afresh. A most common scenario is when you want to refresh the app content or invoke the start-up health check / recovery routine. In these cases, you need to follow a different step, which is explained below:
or open another app, the REP app instance is not stopped / terminated. It just goes in to background mode (a dormant state). That means, the state of the app is saved and you can almost always return to the app where you left it. This can be desirable if you are multi-tasking (working on multiple apps including REP app). But, there are times when you want to completely terminate the app instance and open / start it afresh. A most common scenario is when you want to refresh the app content or invoke the start-up health check / recovery routine. In these cases, you need to follow a different step, which is explained below:
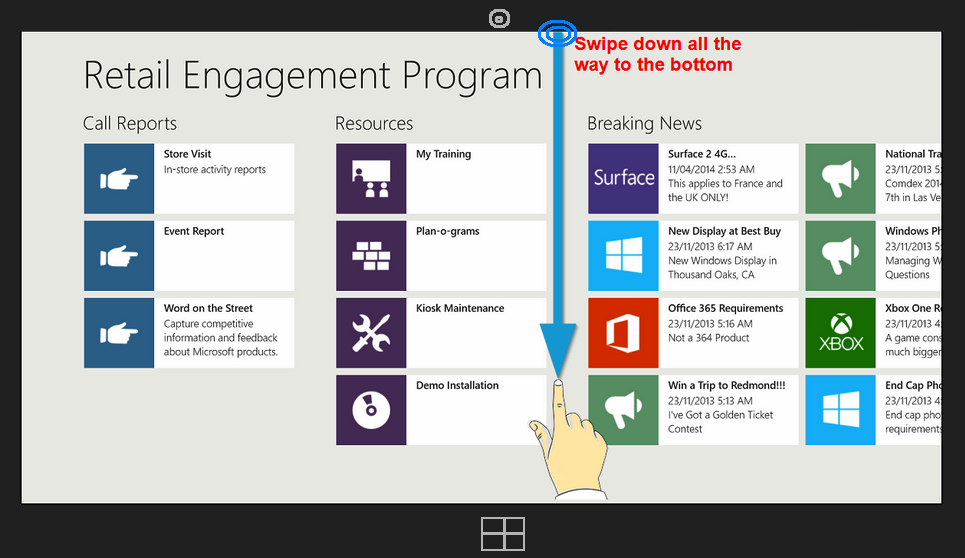
7a. On a Windows 8.1+ device, if you want to completely stop the app, the easiest way is to touch on the top panel, hold down and swipe down all the way to the bottom panel as shown in the picture below:
An alternate way is to switch to desktop mode, then right click on task bar, select Task Manager, select REP app from the list and End the task / process. Refer to the picture below:

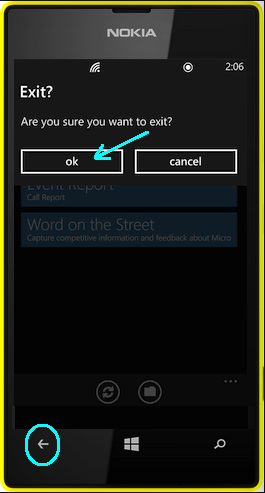
7b. On a Windows Phone 8.0+ device (phones), if you want to terminate the app, just click on the back button from the main screen of REP app (as shown below):
8. Changing the user on client application:
When you run the app on surface device for the first time after a clean installation, it will prompt you for a user id. This user id is stored in the app files. At times you may want to hand over the device to another user, so the new user will then have to log in.
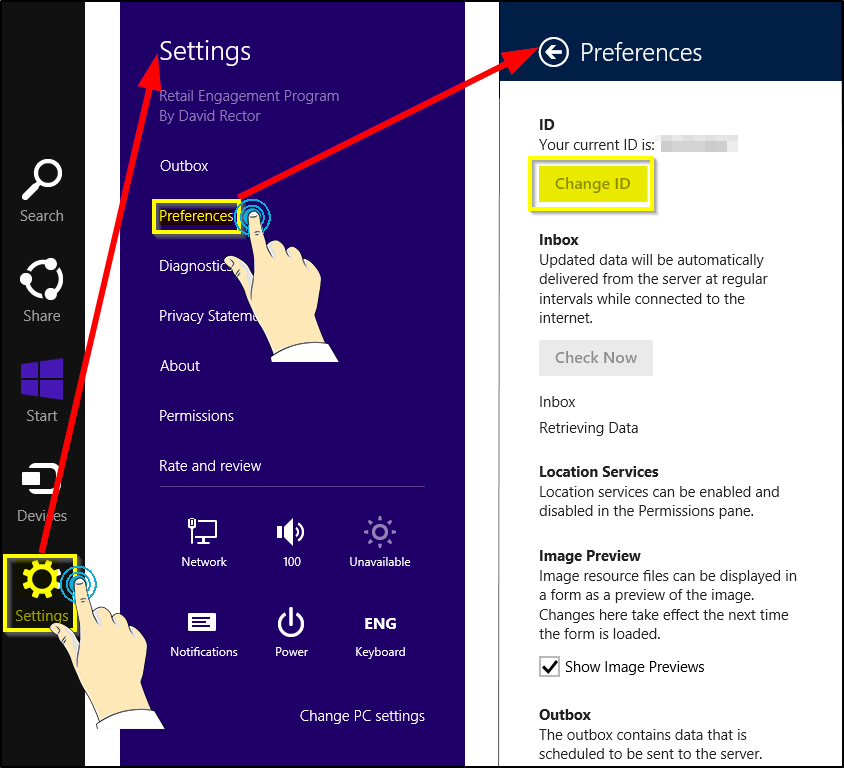
8a. On Windows 8.1+ app, if you want to log in as another user, go to Charms bar >> Settings >> Preferences >> click on ‘Change ID’ button at the top. Some times, this button may appear greyed out (inactive). This happens when you are in the middle of a form activity or browsing activity. In that case, complete / close all that and go to home page and they try.
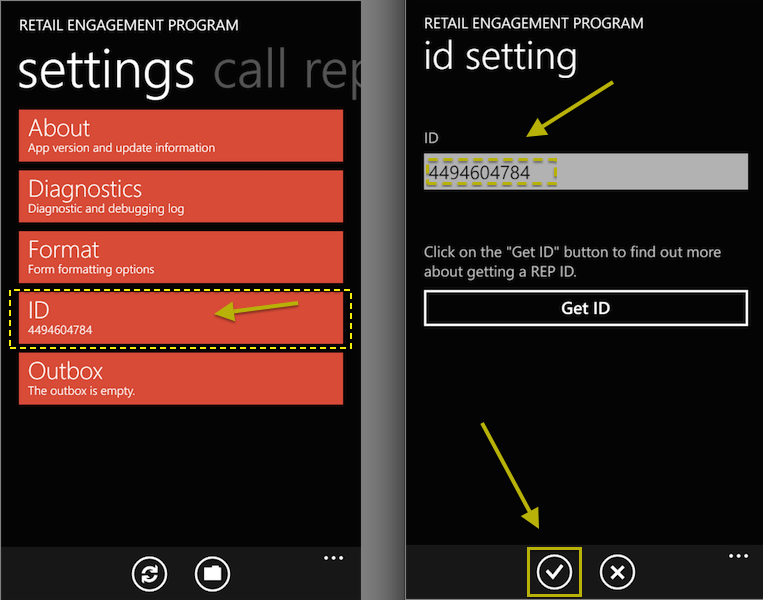
8b. On Windows Phone 8.0+ app, if you want to login as a different user, scroll to the 'settings' section (orange color), click on 'ID' menu. Then enter the new user ID and click on the tick button at the bottom.
9. Viewing Outbox History of client application:
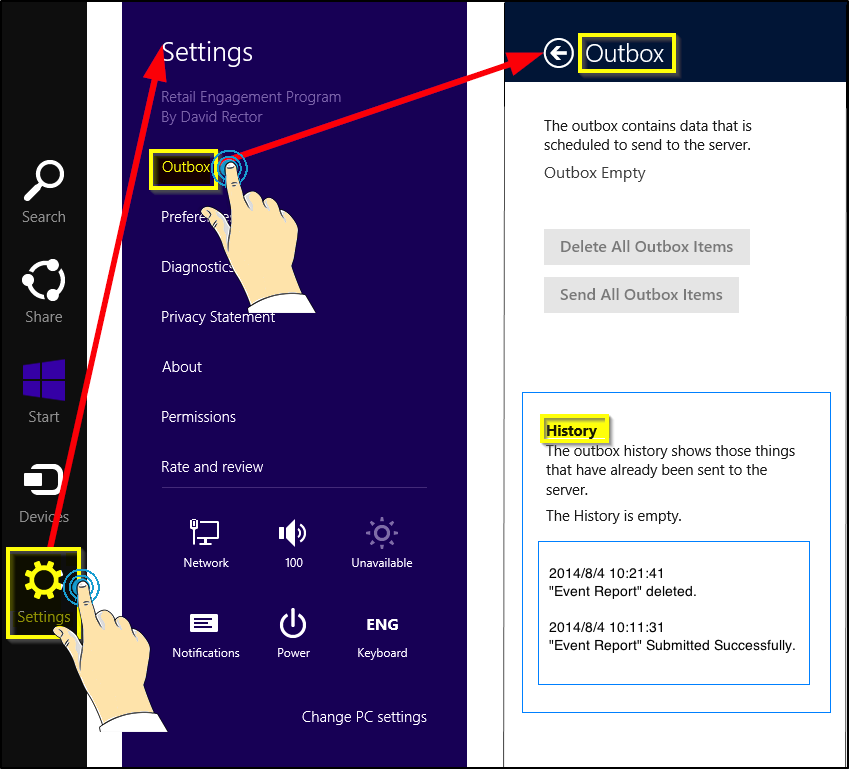
9a. On Windows 8.1+ app, you can view the recent history of the forms you have submitted by going to Charms bar >> Settings >> Outbox >> History (as shown below).
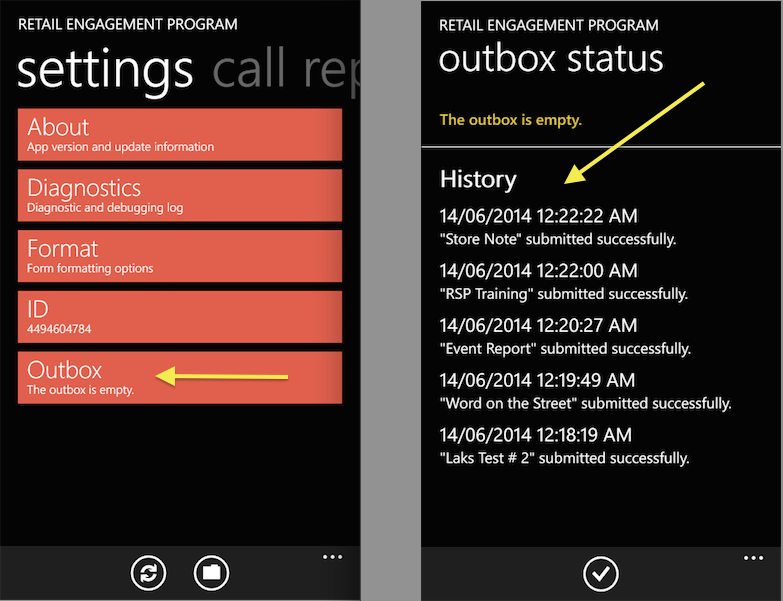
9b. On Windows Phone 8.0+ app, you can view the recent history of the forms you have submitted by scrolling to 'settings' section and clicking on 'Outbox' menu (as shown below):
10. Enabling Automatic Update of the app:
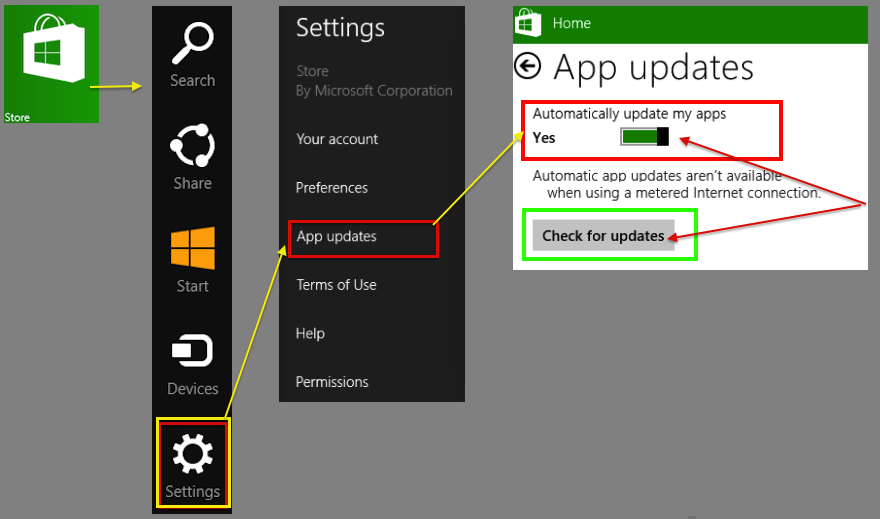
From time to time, updates (new versions) to REP client app will be posted to Windows Store. The updates involve new features, bug fixes, security patches, fine tuning of performance etc. Windows Store can automatically install app updates when they become available. To make sure REP app gets updated automatically, follow these steps:
(If you're using a mouse, point to the lower-right corner of the screen, move the mouse pointer up, and then click Settings)
Note
You can manually check for app updates at any time by tapping or clicking 'Check for updates'.
11. Taking Screen shots on client devices:
11a. On Surface (or similar) hand held tablet devices running on Windows Phone 8.0+, press and hold the Windows button, and while still pressing, press down on the lower volume button. The buttons that you need to press can be seen below.

When you press the buttons correctly, you will see your screen dim for a second as if the shutter on a camera went off. The picture will then appear in the Screenshots folder of Photos app. The files will also appear in your My Pictures folder on your hard drive. This location is C:\Users\\My Pictures\Screenshots. You can also access these screenshots from your Pictures library.
11b. On Windows Phones 8, press 'Start' and 'Power' buttons at the same time. These are automatically saved in the 'Screenshots' album in Photos Hub. On Windows Phones 8.1, press 'Power' and 'Volume Up' buttons at the same time.